1. परिचय र अधिकview
The DIYmall DEVIT V1 ESP-32S Development Board is a versatile 2.4GHz dual-mode WiFi and Bluetooth module designed for various IoT and embedded projects. It features the ESP32-WROOM-32 chip and a CP2102 USB-to-UART bridge, making it compatible with the Arduino IDE and other development frameworks like Espressif IDF, MicroPython, JavaScript, and LUA. This board offers ultra-low power consumption and supports LWIP protocol and FreeRTOS, enabling flexible application development across AP, STA, and AP+STA modes.
This manual provides essential information for setting up, operating, and troubleshooting your DEVIT V1 board.
२. बक्समा के छ?
- 2 x DEVIT V1 ESP-32S Development Boards
3. निर्दिष्टीकरणहरू
| सुविधा | विवरण |
|---|---|
| मोडेल नाम | DEVIT V1 |
| जडान प्रविधि | ब्लुटुथ, वाइफाइ |
| अपरेटिङ सिस्टम | FreeRTOS |
| प्रोसेसर ब्रान्ड | एस्प्रेसिफ |
| वायरलेस अनुकूलता | ब्लुटुथ, वाइफाइ |
| मिल्दो यन्त्रहरू | Arduino devices |
| RAM मेमोरी टेक्नोलोजी | LPDDR |
| प्रोसेसर गणना | 2 |
| कुल USB पोर्टहरू | 1 |
4. सेटअप
१ भौतिक जडान
Connect the DEVIT V1 board to your computer using a micro-USB cable. Ensure the board is properly seated and the cable is securely connected.

Figure 1: DIYmall DEVIT V1 ESP-32S Development Board
4.2 चालक स्थापना
The DEVIT V1 board uses a CP2102 USB-to-UART bridge. If your computer does not automatically recognize the board or assign a COM port, you may need to install the CP210x USB to UART Bridge VCP Drivers. These drivers can typically be found on the Silicon Labs website or by searching for "CP2102 driver".
३.२ Arduino IDE सेटअप
- Install ESP32 Board Support: Arduino IDE मा, जानुहोस् File > प्राथमिकताहरू. In the "Additional Boards Manager URLs" field, add
https://raw.githubusercontent.com/espressif/arduino-esp32/gh-pages/package_esp32_index.json। ठीक छ क्लिक गर्नुहोस्। - मा जानुहोस् Tools > Board > Boards Manager... खोज्नुहोस् "ESP32" र "esp32 by Espressif Systems" प्याकेज स्थापना गर्नुहोस्।
- After installation, select your board: Go to Tools > Board > ESP32 Arduino > DOIT ESP32 DEVKIT V1.
- Select the correct COM Port: Go to उपकरणहरू > पोर्ट and choose the serial port corresponding to your ESP32 board (e.g., /dev/cu.SLAB_USBtoUART on macOS or COMx on Windows).

Figure 2: Selecting the DEVIT V1 board in Arduino IDE
५.१ पिनआउट रेखाचित्र
Refer to the pinout diagram for proper connection of external components and understanding GPIO functionalities.
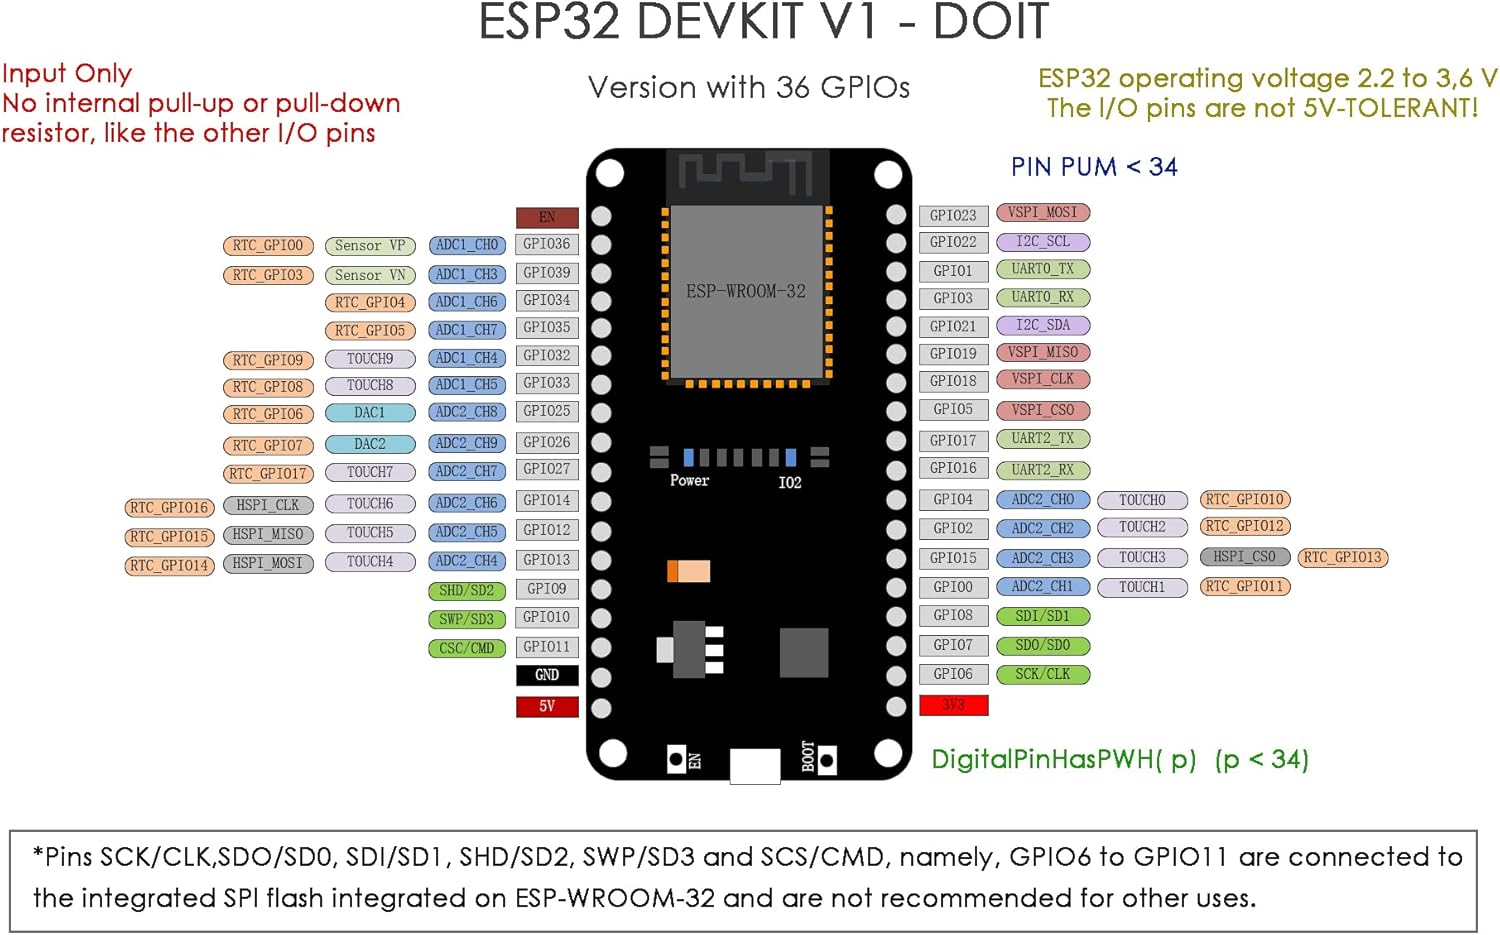
Figure 3: ESP32 DEVIT V1 Pinout Diagram
4.5 Breadboard Usage
The DEVIT V1 board is designed to be breadboard-friendly. When inserting the board into a breadboard, ensure all pins are straight to avoid damage.

Figure 4: DEVIT V1 on a Breadboard
5. सञ्चालन निर्देशनहरू
5.1 Programming the ESP32
The ESP32 can be programmed using various environments. For Arduino IDE, you can upload sketches to control the board's functionalities. A common first step is to upload a basic example like the WiFiScan sketch to verify connectivity.
To upload a sketch:
- पूर्व खोल्नुहोस्ampले स्केच (जस्तै, File > पूर्वamples > WiFi > WiFiScan).
- क्लिक गर्नुहोस् अपलोड गर्नुहोस् button in the Arduino IDE.
- If prompted, press the बुट button on the ESP32 board while uploading until the upload process begins.
- Once uploaded, open the सिरियल मनिटर (Tools > Serial Monitor) and set the baud rate to 115200. Press the सक्षम गर्नुहोस् button on the ESP32 to see the output.
Video 1: How to Program ESP32 DEVIT. This video demonstrates the process of flashing firmware to the ESP32 board using the Espressif Flash Download Tool and the Arduino IDE.
Video 2: How to Test DOIT DEVIT V1. This video shows how to test the basic functionality of the DEVIT V1 board after programming.
5.2 Connecting External Modules
The DEVIT V1 board can be easily extended with various sensors and modules. For example, you can connect a BME680 sensor or an OLED display with a DS3231 clock module.

Figure 5: BME680 Sensor Connection Example
Video 3: How to Use DOIT DEVIT V1 with OLED Module + Clock Module. This video demonstrates connecting and using an OLED display and a DS3231 clock module with the ESP32 DEVIT V1.
6. मर्मतसम्भार
To ensure the longevity and proper functioning of your DEVIT V1 board, follow these maintenance guidelines:
- Keep the board in a dry environment, away from moisture and extreme temperatures.
- Handle the board with care to avoid bending pins or damaging components.
- Avoid static discharge by working on an anti-static mat or grounding yourself.
- Clean the board gently with a soft, dry brush if dust accumulates. Do not use liquids.
T. समस्या निवारण
If you encounter issues with your DEVIT V1 board, consider the following troubleshooting steps:
- बोर्ड पत्ता लागेन: Ensure the CP2102 drivers are correctly installed. Try a different USB cable or USB port.
- अपलोड त्रुटिहरू: Verify that the correct board type (DOIT ESP32 DEVKIT V1) and COM port are selected in the Arduino IDE. If you receive a "Failed to connect to ESP32" or similar error, try holding down the बुट button on the board while clicking अपलोड गर्नुहोस् in the IDE, then release the BOOT button once the upload starts. You might also need to try a lower baud rate for flashing, such as 115200.
- No Serial Monitor Output: Ensure the baud rate in the Serial Monitor matches the baud rate specified in your sketch (e.g., 115200). Press the सक्षम गर्नुहोस् button on the board after uploading to reset and start the program.
- शक्ति समस्याहरू: Check your USB power source. Some projects might require an external power supply if the USB port cannot provide enough current.
- Component Connection Issues: Double-check all wiring connections, especially for external modules, ensuring they match the pinout diagram and your code.
8. वारेन्टी र समर्थन
For specific warranty information, please refer to the product's purchase documentation or contact DIYmall customer support directly. Technical support and additional resources may be available through the DIYmall website or relevant online developer communities for ESP32.