1. महत्त्वपूर्ण सुरक्षा जानकारी
स्थापना र प्रयोग सुरु गर्नु अघि कृपया सबै निर्देशनहरू पढ्नुहोस् र बुझ्नुहोस्। यी निर्देशनहरू पालना गर्न असफल भएमा विद्युतीय झट्का, आगो, वा अन्य खतराहरू हुन सक्छन् जसले चोटपटक वा सम्पत्ति क्षति पुर्याउन सक्छ।
- व्यावसायिक स्थापना सिफारिस गरिएको: यदि तपाईं विद्युतीय तारको बारेमा अनिश्चित हुनुहुन्छ भने, एक योग्य इलेक्ट्रीशियनसँग परामर्श गर्नुहोस्।
- पावर विच्छेदन: फिक्स्चर स्थापना, सफा गर्नु वा सर्भिस गर्नु अघि सधैं मुख्य सर्किट ब्रेकरमा पावर विच्छेद गर्नुहोस्।
- हेरचाह संग ह्यान्डल: The chandelier contains delicate crystal components. Handle them carefully to prevent breakage or injury.
- बल्ब आवश्यकताहरु: Use only E12 base candle bulbs, maximum 60W per bulb. Do not exceed the recommended wattage.
- सुरक्षित माउन्टिङ: माउन्टिङ सतहले फिक्स्चरको तौललाई समर्थन गर्न सक्छ भनी सुनिश्चित गर्नुहोस्।
- ग्राउन्डिङ: Properly ground the fixture to avoid potential electrical shock.
2. प्याकेज सामग्री
Carefully unpack all components and inspect for any damage. Keep all packaging materials until you are satisfied with the product. Refer to the diagram below for component identification.

Image: All chandelier components laid out, including the ceiling canopy, chain, main body, bulb sockets, and various crystal elements.
- Main Chandelier Body (with pre-wired arms)
- Ceiling Canopy and Mounting Hardware
- समायोज्य चेन
- Crystal Droplets and Chains (various sizes and shapes, typically labeled A, B, C, D, E, F, G, H)
- Candle Sleeves (6 pieces)
- तार पागल
- निर्देशन पुस्तिका
3. स्थापना निर्देशनहरू
Follow these steps carefully for proper installation. It is recommended to have a second person assist during the mounting process.
3.1. तयारी
- Turn off the electricity at the main fuse box or circuit breaker.
- सुनिश्चित गर्नुहोस् कि सबै भागहरू उपस्थित छन् र क्षतिग्रस्त छैनन्।
- Wear protective gloves when handling crystal components to avoid fingerprints.
3.2. Assembling the Chandelier Body
The main body of the chandelier may require some assembly before mounting. This typically involves attaching the arms to the central column and securing them.
Video: Detailed installation guide for AGV LIGHTING Chandelier models CH001 & CH002, demonstrating assembly of the main body, wiring, and crystal attachment.
- Attach the chandelier arms to the central hub using the provided screws. Ensure they are securely fastened.
- Thread the electrical wires from each arm through the central column.
- Secure the top and bottom crystal elements of the central column.
३. तार र माउन्टिङ
This step involves connecting the chandelier's electrical wires to your home's wiring and securing the fixture to the ceiling.
- Install the mounting bracket to the junction box in your ceiling.
- Connect the chandelier's wires to the house wires:
- Connect the black wire (live) from the fixture to the black wire from the junction box using a wire nut.
- Connect the white wire (neutral) from the fixture to the white wire from the junction box using a wire nut.
- Connect the green or bare copper wire (ground) from the fixture to the ground wire from the junction box or the mounting bracket.
- सावधानीपूर्वक जंक्शन बक्समा सबै तारहरू टक गर्नुहोस्।
- Attach the ceiling canopy to the mounting bracket, securing it with the decorative nuts.
- Adjust the chain length as desired. The chain is adjustable up to 39 inches (100 cm).
छवि: क्लोज-अप view of the chandelier's ceiling canopy and the intricate crystal details on the arms, illustrating the connection points.
3.4. Attaching Crystal Elements
The crystal elements are typically attached using small metal hooks. Refer to the provided diagrams or the installation video for the correct placement of each crystal type (A, B, C, D, E, F, G, H).
- Insert the candle sleeves over the bulb sockets.
- Carefully attach each crystal droplet and chain to the designated holes on the chandelier arms and central column.
- Ensure all crystals are securely fastened.

Image: The AGV LIGHTING Chandelier fully installed and illuminated in a modern living room setting.
4. सञ्चालन निर्देशनहरू
Once installed, your chandelier is ready for operation.
- पावर अन: मुख्य सर्किट ब्रेकरमा पावर पुनर्स्थापित गर्नुहोस्।
- प्रकाश नियन्त्रण: Operate the chandelier using your wall switch.
- डिमिङ प्रकार्य: If using dimmable E12 bulbs and a compatible dimmer switch (not included), you can adjust the light intensity as desired. The chandelier supports app control for dimming if integrated with a smart home system.
5. मर्मतसम्भार
Regular cleaning will help maintain the chandelier's appearance and sparkle.
- क्रिस्टल सफा गर्ने:
- Turn off the power to the fixture before cleaning.
- नरम, लिन्ट-रहित कपडा प्रयोग गर्नुहोस् dampपानी वा हल्का गिलास क्लीनर संग समाप्त।
- Avoid abrasive cleaners or harsh chemicals that could damage the crystal or metal finish.
- For thorough cleaning, some crystal elements can be carefully removed and washed in warm, soapy water, then rinsed and dried completely before reattaching.
- धातुका भागहरू सफा गर्ने:
- Wipe metal surfaces with a soft, dry cloth.
- Do not use abrasive materials or polishes that could scratch the finish.
- बल्ब प्रतिस्थापन:
- बल्बहरू बदल्नु अघि बिजुली बन्द छ भनी सुनिश्चित गर्नुहोस्।
- बल्बहरूलाई छुनु अघि पूर्ण रूपमा चिसो हुन दिनुहोस्।
- Replace with E12 base candle bulbs, maximum 60W.
T. समस्या निवारण
यदि तपाईंले आफ्नो झूमरमा समस्याहरू सामना गर्नुभयो भने, निम्न सामान्य समस्याहरू र समाधानहरू हेर्नुहोस्:
| समस्या | सम्भावित कारण | समाधान |
|---|---|---|
| प्रकाश खुल्ला छैन। |
|
|
| बत्तीहरू अचानक झिलिमिली वा मधुरो हुन्छन्। |
|
|
| Chandelier is unstable or wobbles. |
|
|
7. निर्दिष्टीकरणहरू
Key technical details for the AGV LIGHTING Chandelier Model AGV-CH002S.
| सुविधा | विवरण |
|---|---|
| ब्रान्ड | AGV LIGHTING |
| मोडेल नम्बर | AGV-CH002S |
| उत्पादन आयामहरू | ११"लिटर x ४"पाउट x १३"घण्टा |
| समायोज्य चेन लम्बाइ | Max 39" (100 cm) |
| रङ | क्रोम ७२ |
| सामग्री | मिश्र धातु स्टील, क्रिस्टल |
| बत्तीहरूको संख्या | 6 |
| बल्ब आधार | E12 |
| अधिकतम वाटtage प्रति बल्ब | 60W |
| शक्ति स्रोत | कर्ड इलेक्ट्रिक |
| स्थापना प्रकार | सेमी फ्लस माउन्ट |
| विशेष सुविधा | Dimmable (with compatible bulbs/switch) |
| नियन्त्रण विधि | App (for dimming, if integrated with smart home system) |
| वस्तुको वजन | ०.६६ पाउण्ड (लगभग ०.३२ किलोग्राम) |
| विधानसभा आवश्यक | हो |

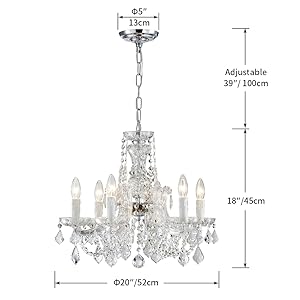
Image: Dimensional diagram of the chandelier, indicating a diameter of 20 inches (52 cm), a fixture height of 18 inches (45 cm), and an adjustable chain length up to 59 inches (150 cm).
8. वारेन्टी र समर्थन
This product comes with a manufacturer-and-seller-combination warranty. For specific warranty details, claims, or technical support, please refer to the contact information provided at the point of purchase or visit the official AGV LIGHTING webसाइट।
For further assistance, you may contact AGV LIGHTING directly via their store page: AGV LIGHTING Store.