1. परिचय
This manual provides detailed instructions for the safe and effective use of your AXNEN C22 2-Axis AI Tracking Phone Gimbal Stabilizer. Please read this manual thoroughly before operation and retain it for future reference. The AXNEN C22 is a versatile 4-in-1 device functioning as a universal stabilizer, extensible selfie stick, desktop tripod, and features 360-degree AI tracking.
2. प्याकेज सामग्री
तल सूचीबद्ध सबै वस्तुहरू तपाईंको प्याकेजमा समावेश छन् भनी प्रमाणित गर्नुहोस्। यदि कुनै वस्तुहरू हराइरहेको वा बिग्रिएको छ भने, कृपया ग्राहक समर्थनलाई सम्पर्क गर्नुहोस्।
- C22 Gimbal Stabilizer x 1
- USB-C चार्जिङ केबल x १
- प्रयोगकर्ता पुस्तिका x १

Image: Contents of the AXNEN C22 package, including the gimbal, USB cable, and user manual.
3. उत्पादन समाप्तview
The AXNEN C22 combines multiple functionalities into a single device, offering stability and flexibility for mobile photography and videography.
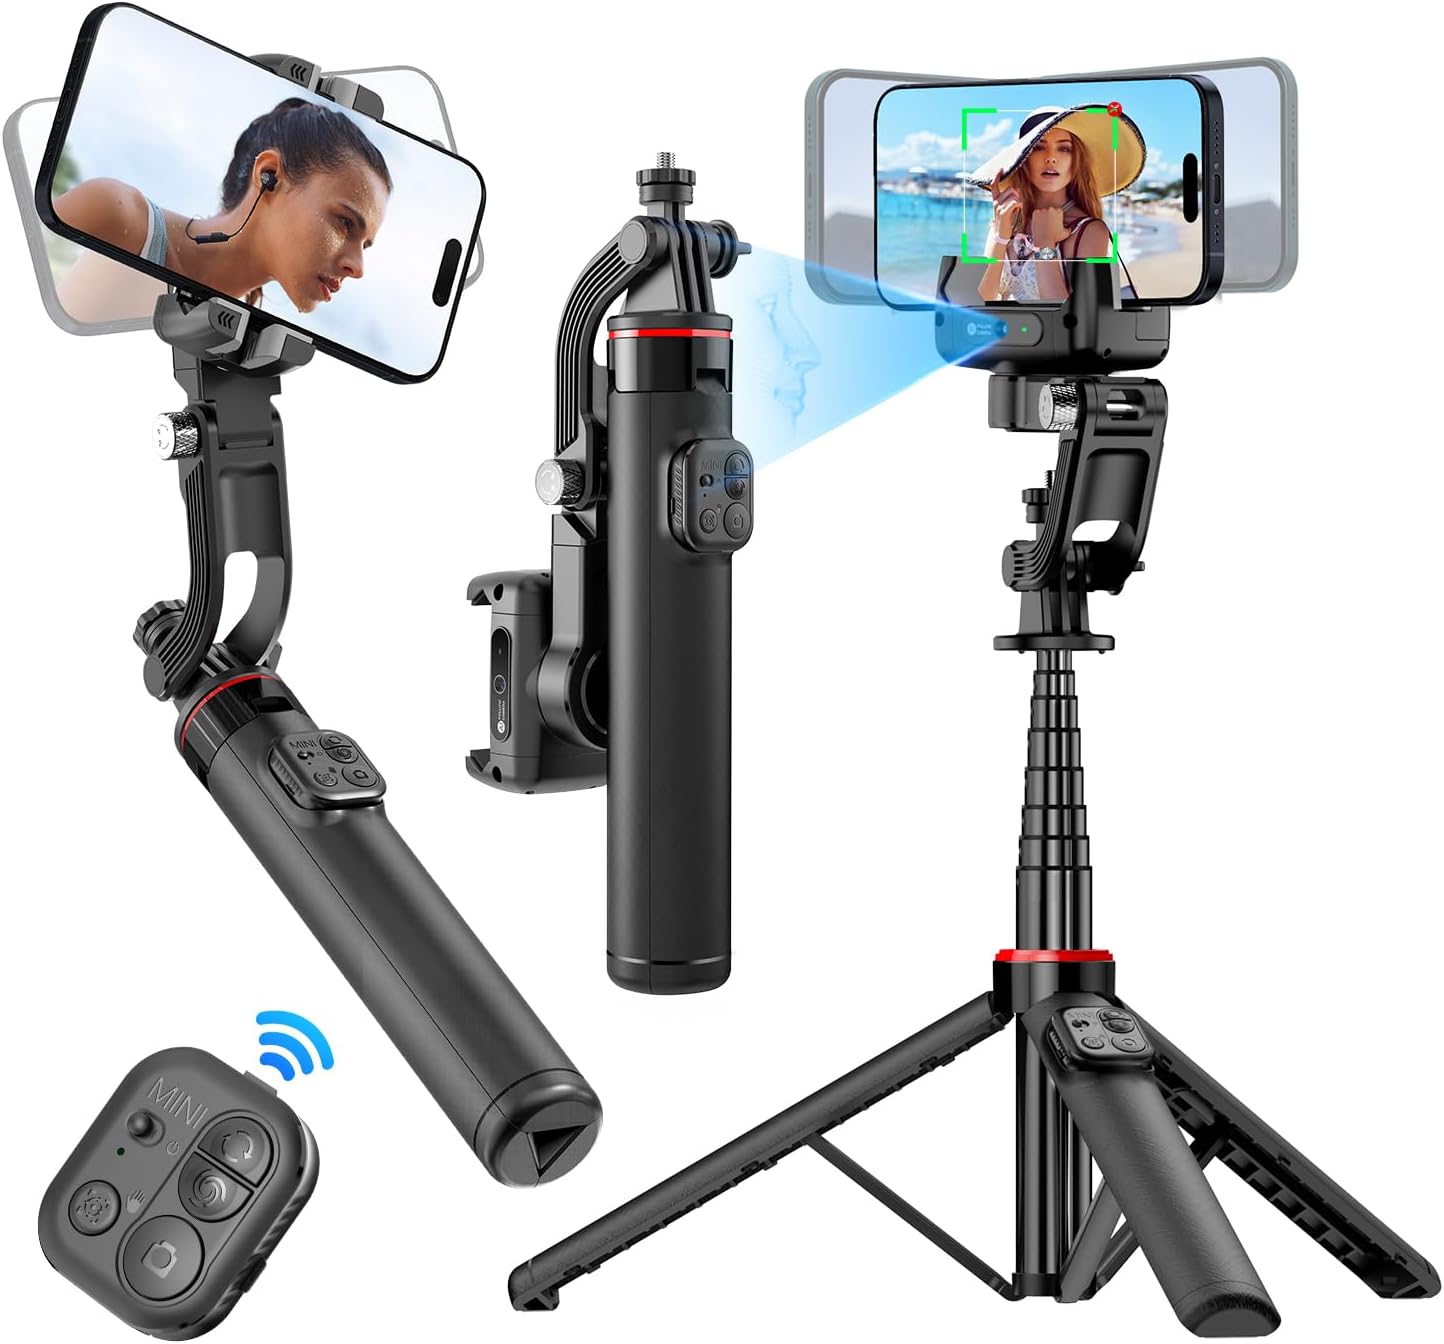
Image: The AXNEN C22 Gimbal Stabilizer shown in its different modes: handheld, extended selfie stick, and tripod setup, highlighting its versatility.
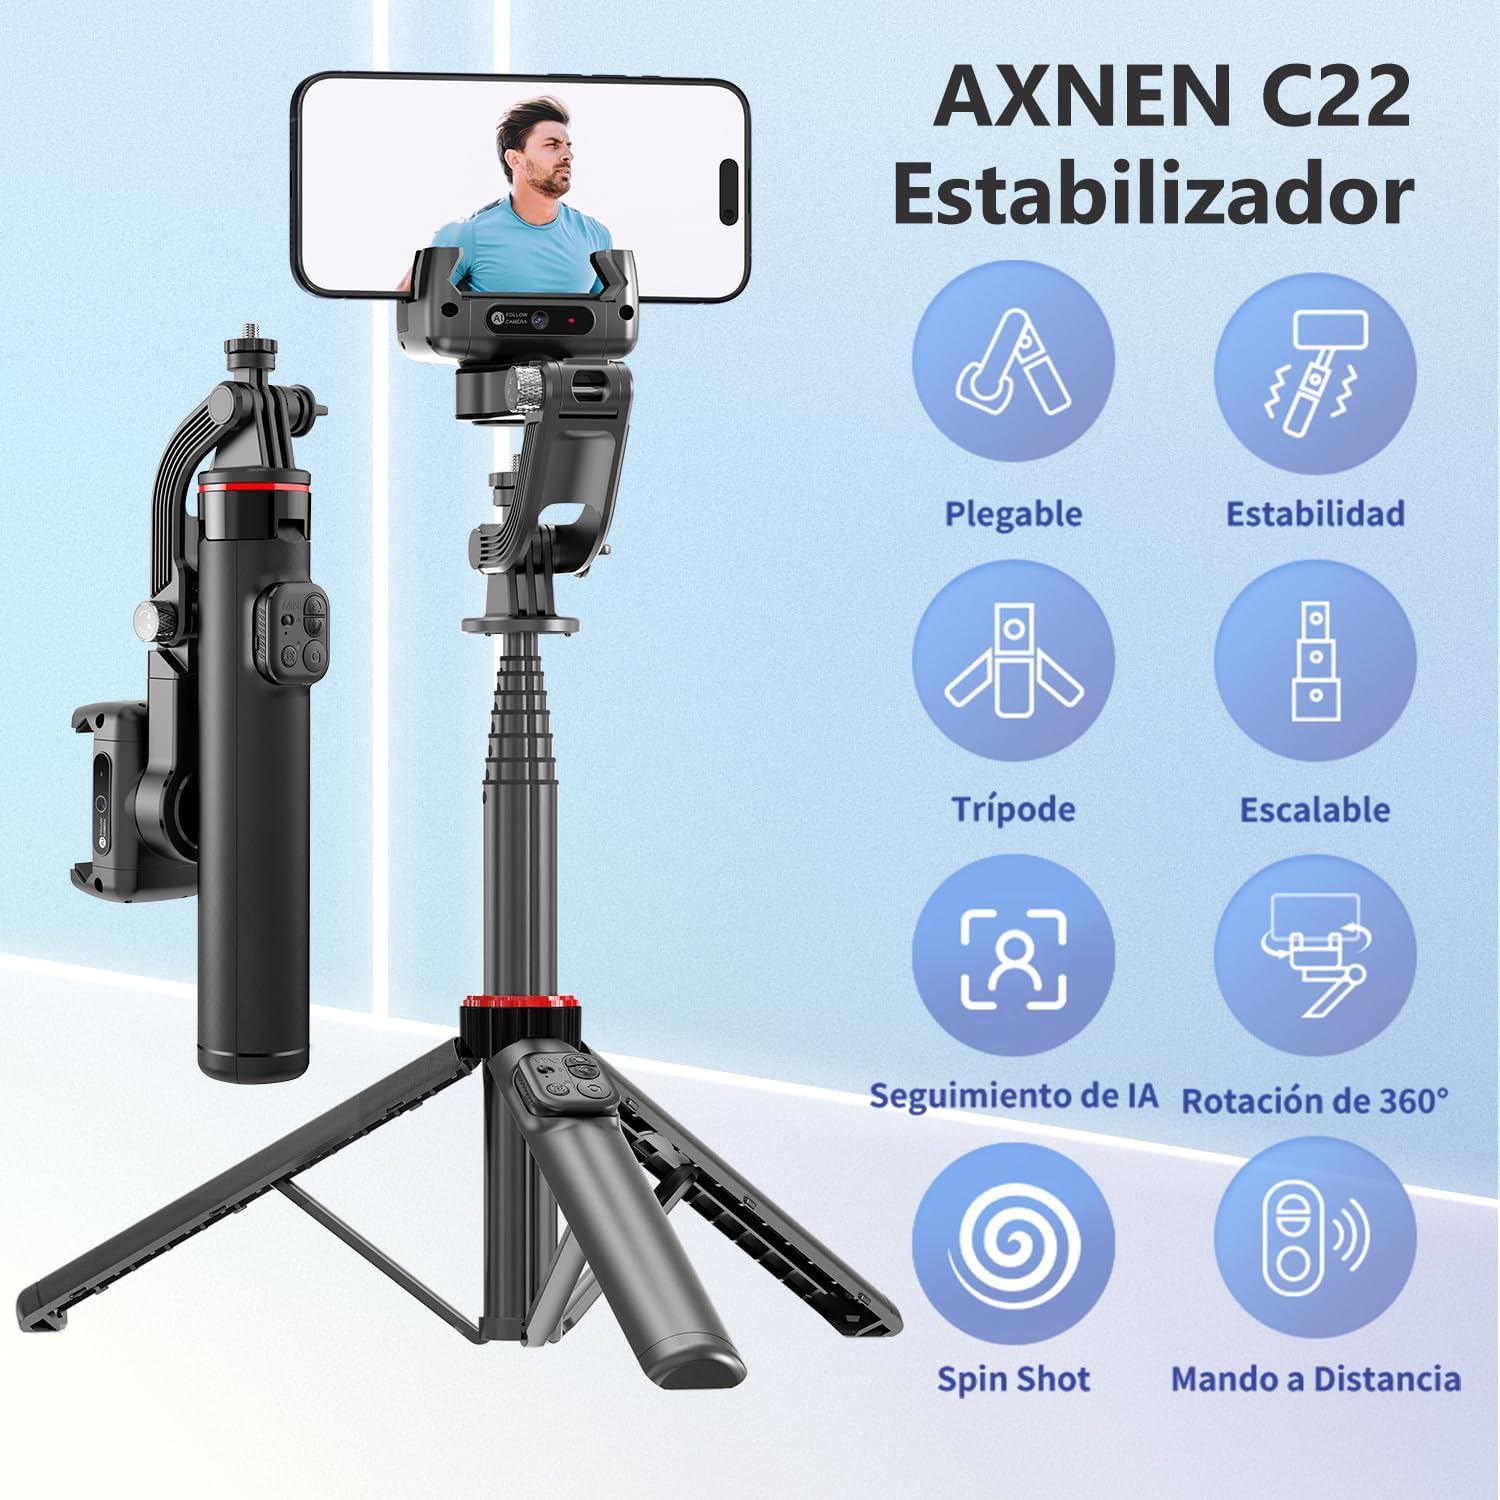
Image: Visual representation of the AXNEN C22's key features, including its foldable design, stability, tripod functionality, extendable pole, AI tracking, 360-degree rotation, spin shot capability, and remote control.
4. सेटअप
४.१ गिम्बल खोल्दै
- Gently unfold the gimbal arm until it locks into position.
- Extend the telescopic pole to your desired length if using as a selfie stick.
- For tripod use, spread the base legs firmly on a flat surface.
५.२ फोन स्थापना
- Ensure the gimbal head is unlocked before installing your phone to avoid motor damage.
- आफ्नो स्मार्टफोनलाई फोन क्ल्याम्पमा सावधानीपूर्वक राख्नुहोस्।amp, यो केन्द्रित र सुरक्षित छ भनी सुनिश्चित गर्दै।
- The gimbal will automatically balance the phone.
4.3 चार्ज गर्दै
Connect the provided USB-C cable to the charging port on the gimbal and to a suitable USB power source. The indicator light will show charging status. A full charge takes approximately 80 minutes.

Image: The AXNEN C22 gimbal connected via a USB-C cable for ultra-fast charging, highlighting its quick 80-minute full charge time.
४ ब्लुटुथ जोडी
- जिमबलमा पावर।
- आफ्नो स्मार्टफोनमा ब्लुटुथ सक्रिय गर्नुहोस्।
- खोज्नुहोस् available devices and select "AXNEN C22" to pair.
- The remote control will automatically connect once the gimbal is paired.

Image: The AXNEN C22 remote control in use, demonstrating its 10-meter (33-foot) range for hands-free operation.
4.5.१ अनुप्रयोग स्थापना
For enhanced features, download the "Gimbal Show" application. Scan the QR code in the manual or visit the official website to download the app for iOS or Android devices.
Download the Gimbal Show App: https://www.tokqi.co/app.php/tokqi

Image: Screenshot of the Gimbal Show app interface, illustrating features like facial filters, dynamic zoom, time-lapse, and intelligent tracking.
5. सञ्चालन निर्देशनहरू
५.१ पावर अन/अफ
Press and hold the power button on the gimbal handle for 3 seconds to power on or off.
5.2 रिमोट कन्ट्रोल प्रकार्यहरू
The detachable remote control allows for convenient operation from a distance.
- पावर स्विच: रिमोट अन/अफ गर्छ।
- स्विच बटन: Toggles between different modes or functions.
- मोड बटन: Selects specific gimbal modes.
- फोटो बटन: फोटो खिच्ने वा भिडियो रेकर्ड गर्ने कामलाई ट्रिगर गर्छ।
- लक बटन: Locks the gimbal's position.

छवि: विस्तृत view of the AXNEN C22 remote control, with each button clearly labeled for its function, emphasizing ease of use.
६.२ गिम्बल मोडहरू
The AXNEN C22 offers multiple configurations to suit various shooting needs.
- गिम्बल स्टेबिलाइजर मोड: Provides smooth, stable footage by counteracting unwanted movements.
- सेल्फी स्टिक मोड: Extend the pole for wider shots or group selfies.
- ट्राइपड मोड: Deploy the legs for stable static shots or time-lapses.
- Live Streaming Mode: Ideal for stable, hands-free video broadcasts.

Image: Four distinct usage scenarios for the AXNEN C22, illustrating its functionality as a gimbal stabilizer, selfie stick, live streaming stand, and floor tripod.
To switch between Gimbal Mode and Selfie Stick Mode, use the quick switch mechanism. It is recommended to use the gimbal lock when the battery is low to conserve power.

Image: Diagram showing the quick switch mechanism on the AXNEN C22 to toggle between selfie stick mode (locked) and gimbal mode (unlocked).
5.4 AI ट्र्याकिङ
The built-in AI camera allows for intelligent facial and object tracking. Use gestures to control tracking.
- "ठीक छ" इशारा: Initiates tracking.
- "पाम" इशारा: Stops tracking.
The gimbal can track subjects whether stationary on a desktop or moving during manual operation.

Image: The AXNEN C22's smart AI camera feature, demonstrating gesture controls for initiating and stopping tracking, with a focus on facial recognition.

छवि: पूर्वamples of the AXNEN C22's AI tracking in action, including desktop tracking for static subjects and manual tracking for moving subjects, ensuring the face remains centered.
५.२ ३६०° परिक्रमा
The gimbal supports 360-degree rotation for panoramic shots and dynamic video effects.
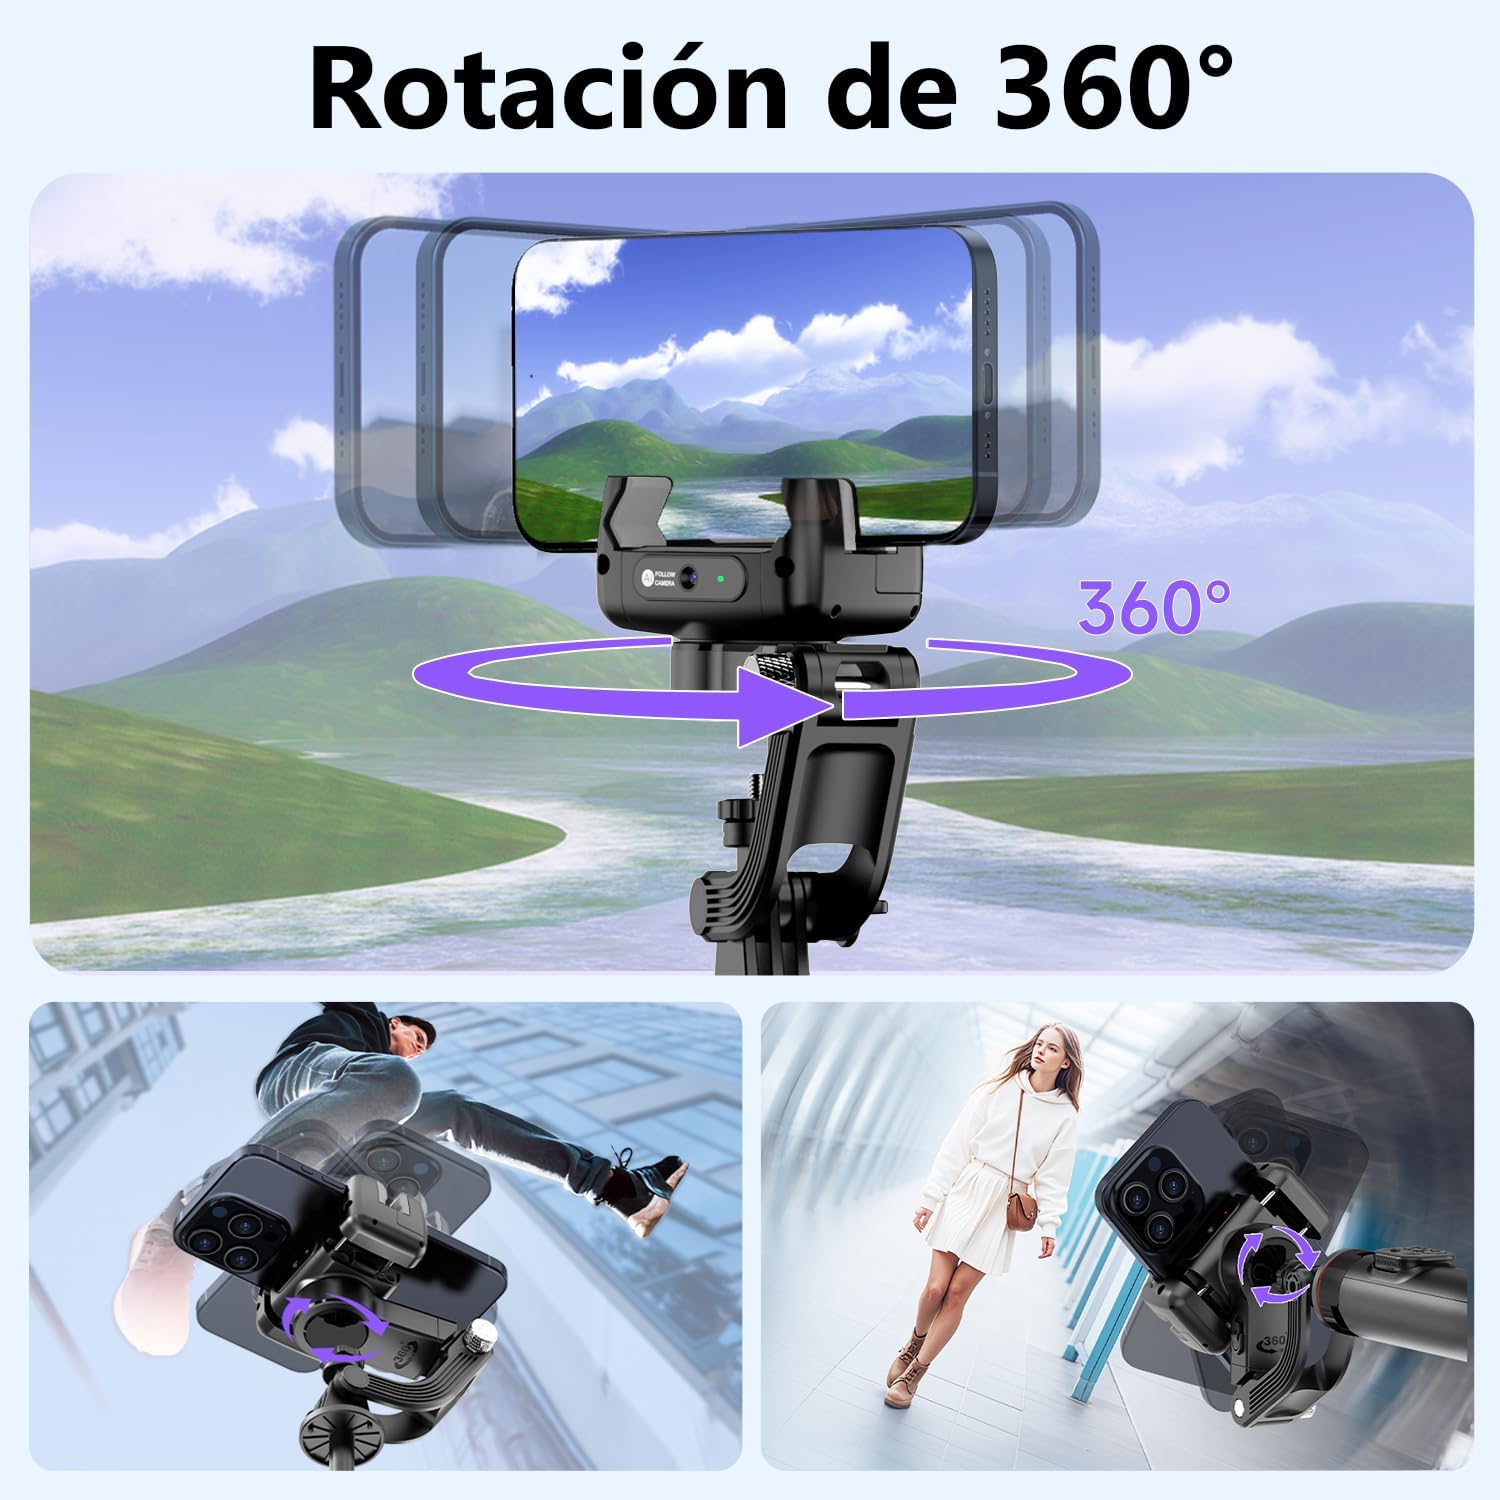
Image: The AXNEN C22 demonstrating its 360-degree rotation capability, allowing for versatile shooting angles and creative video effects.
5.6 एप सुविधाहरू
The "Gimbal Show" app unlocks advanced shooting modes and features:
- Facial Filter: Apply real-time filters to enhance your appearance.
- डायनामिक जुम: Achieve cinematic zoom effects like the Hitchcock zoom.
- टाइम-लेप्स: आश्चर्यजनक टाइम-ल्याप्स भिडियोहरू खिच्नुहोस्।
- स्मार्ट ट्र्याकिङ: Enhanced AI tracking capabilities.

Image: Screenshots from the Gimbal Show app, showcasing features such as facial filters, dynamic zoom, time-lapse recording, and intelligent tracking.
5.7 उपयोग परिदृश्यहरू
The AXNEN C22 is designed for various daily applications:
- 360° Rotating Shot: For dynamic and immersive videos.
- Sports Shot: Capture smooth action footage.
- Low Angle Shot: Get unique perspectives.
- Daily Vlog: Perfect for everyday content creation.

छवि: चार पूर्वamples illustrating how the AXNEN C22 can be used in daily life for various shooting styles, including 360-degree rotation, sports, low-angle, and vlogging.
6. मर्मतसम्भार
- सरसफाई: Use a soft, dry cloth to clean the gimbal. Avoid using harsh chemicals or abrasive materials.
- भण्डारण: Store the gimbal in a cool, dry place away from direct sunlight and extreme temperatures. Ensure it is folded and locked when not in use.
- ब्याट्री केयर: ब्याट्रीको आयु बढाउनको लागि, ब्याट्रीलाई बारम्बार पूर्ण रूपमा चार्ज नगर्नुहोस्। लामो समयसम्म प्रयोगमा नभए पनि, नियमित रूपमा उपकरण चार्ज गर्नुहोस्।
T. समस्या निवारण
| मुद्दा | सम्भावित कारण | समाधान |
|---|---|---|
| Gimbal not stabilizing / Unstable footage | Phone not properly balanced; Gimbal head locked; Low battery. | फोन केन्द्रमा र क्ल्याम्पमा छ भनी सुनिश्चित गर्नुहोस्amp is secure. Unlock the gimbal head. Charge the gimbal fully. |
| ब्लुटुथ बारम्बार विच्छेद हुन्छ | Interference; Out of range; Low battery on remote or gimbal. | Ensure no strong interference sources nearby. Stay within 10m range. Charge both gimbal and remote. Re-pair Bluetooth. |
| AI Tracking not working | Poor lighting; Incorrect gesture; App not running or updated. | Ensure adequate lighting. Use clear "OK" or "Palm" gestures. Open the Gimbal Show app and ensure it's up to date. |
| छोटो ब्याट्री जीवन | Frequent heavy use; Old battery; Cold environment. | Ensure full charge before use. Avoid extreme temperatures. Consider carrying a portable power bank for extended sessions. |
| Gimbal motor feels weak or unresponsive | Low battery; Overloaded with heavy phone; Gimbal head locked. | Charge the gimbal. Ensure your phone's weight is within the supported range. Unlock the gimbal head. |
8. निर्दिष्टीकरणहरू
- मोडेल नम्बर: C22
- ब्रान्ड: AXNEN
- आयाम (प्याकेज): ३७ x १७ x १७ सेमी
- वजन: 360 ग्राम
- मिल्दो यन्त्रहरू: Mobile phones, iPhone, Android
- ब्याट्री प्रकार: 1 AA (Type of battery needed - Note: This likely refers to the remote control, the gimbal itself has a built-in rechargeable battery.)
- रंग: कालो
9. वारेन्टी र समर्थन
वारेन्टी जानकारी र ग्राहक समर्थनको लागि, कृपया तपाईंको खरिदसँग समावेश गरिएका कागजातहरू हेर्नुहोस् वा खुद्रा विक्रेतालाई सम्पर्क गर्नुहोस्। कुनै पनि वारेन्टी दावीहरूको लागि खरिदको प्रमाण राख्नुहोस्।