cudinham X6 Mini Printer (MP-01)
cudinham X6 Mini Printer (MP-01) Instruction Manual
Model: X6 (MP-01)
Your guide to setting up, operating, and maintaining your portable thermal printer.
1. परिचय
The cudinham X6 Mini Printer (MP-01) is a compact, inkless thermal printer designed for on-the-go printing. It connects wirelessly to your smartphone via Bluetooth, allowing you to print photos, notes, to-do lists, and custom stickers using the dedicated 'Tiny Print' application. This manual provides essential information to help you get the most out of your device.
२. बक्समा के छ?
कृपया अनबक्सिङ गर्दा प्याकेजको सामग्री जाँच गर्नुहोस्:
- 1 x cudinham X6 Mini Printer (MP-01)
- 1 x USB Type-C चार्जिङ केबल
- 5 x Rolls of Adhesive Thermal Printing Paper
- 5 x Rolls of Standard Thermal Printing Paper
- 1 x प्रयोगकर्ता पुस्तिका
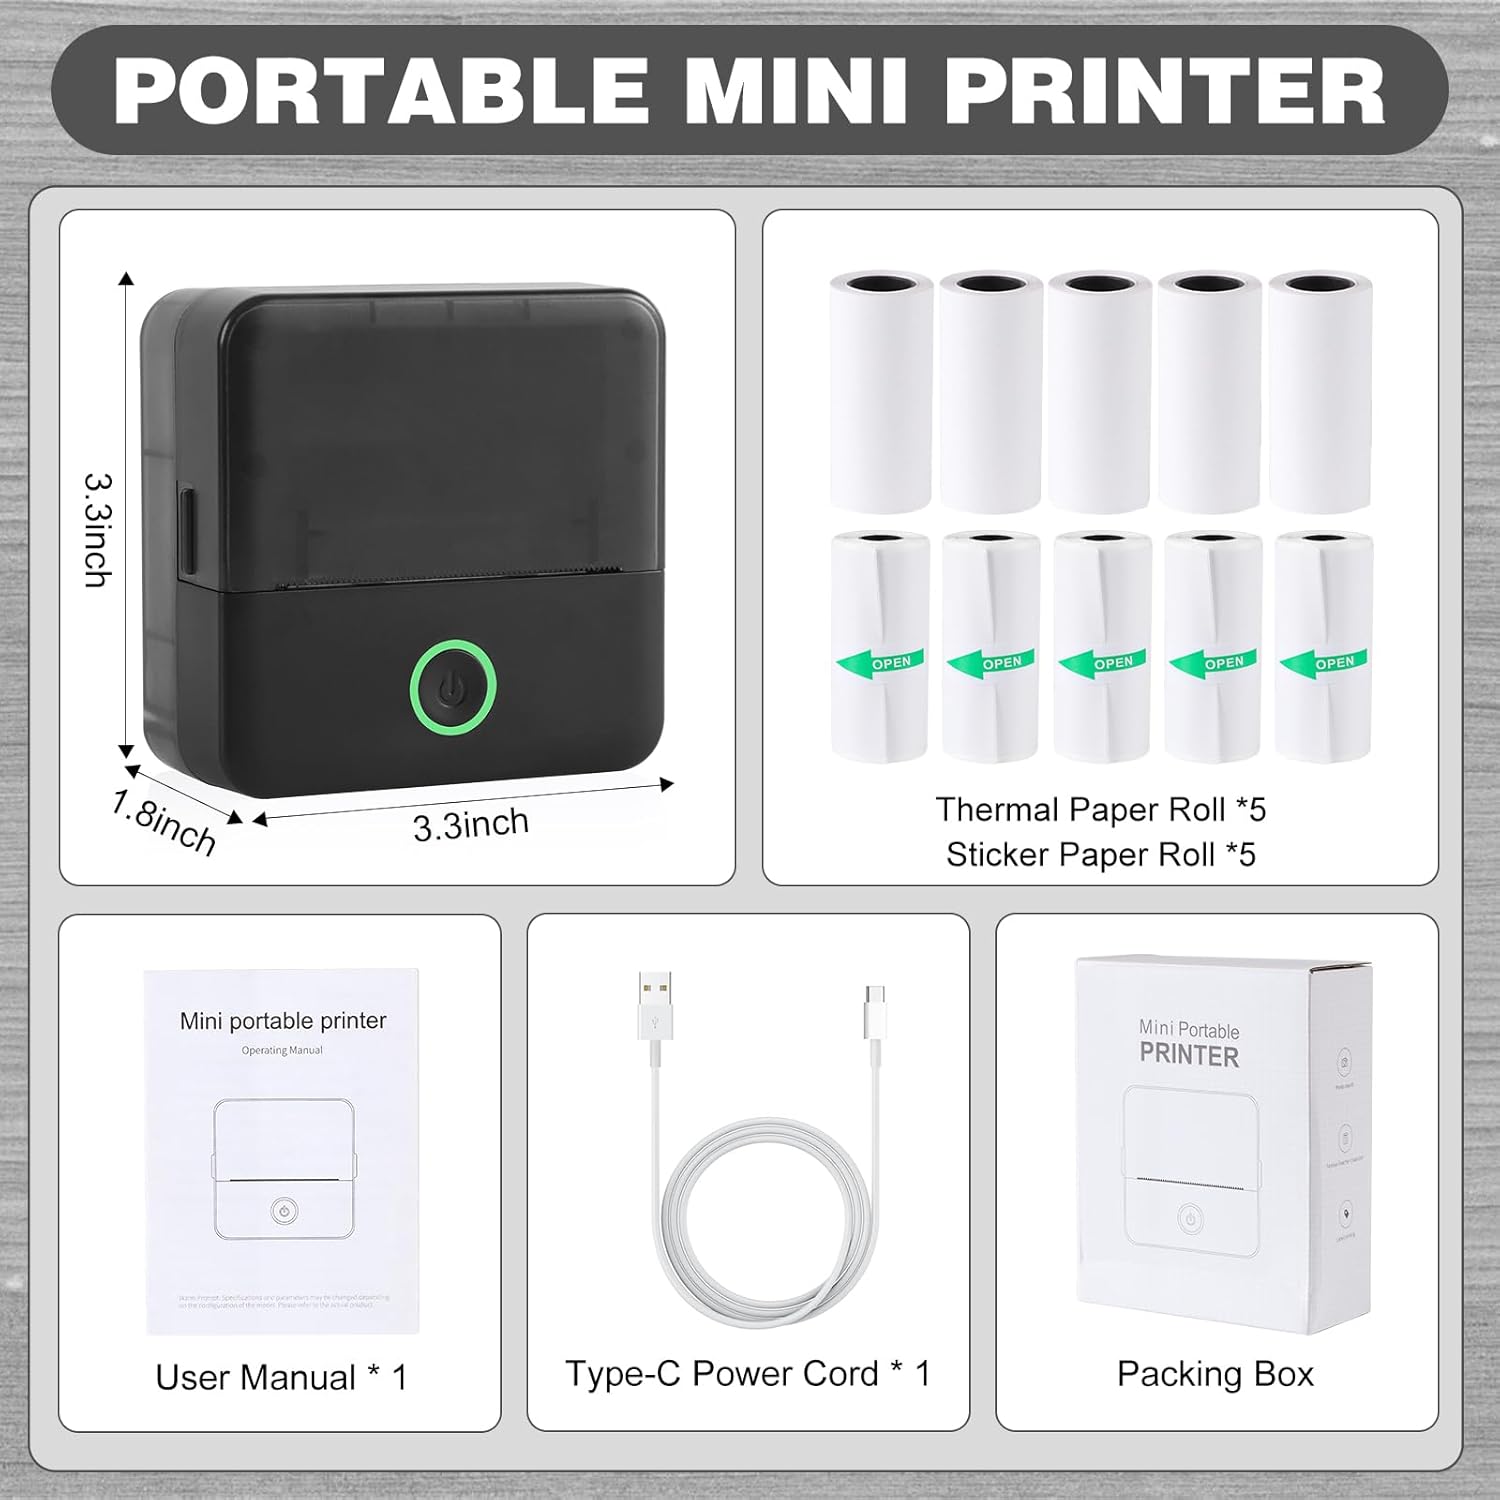
Image: The cudinham X6 Mini Printer and its included accessories: charging cable, user manual, and various thermal paper rolls.
3. सेटअप
३. प्रिन्टर चार्ज गर्दै
Before first use, ensure the printer is fully charged. Connect the provided USB Type-C cable to the printer's charging port and a compatible USB power adapter (not included). The power indicator light will show charging status.
3.2. एप स्थापना
The cudinham X6 Mini Printer operates via the 'Tiny Print' mobile application. Download the app from the एप स्टोर (iOS) or गुगल प्ले स्टोर (एन्ड्रोइड).

Image: The 'Tiny Print' app interface, highlighting its various functions for printing.
Bluetooth. ब्लुटुथ जडान
- Turn on the printer by pressing and holding the power button until the indicator light illuminates.
- आफ्नो स्मार्टफोनमा ब्लुटुथ सक्षम गर्नुहोस्।
- Open the 'Tiny Print' app. The app will automatically search for nearby printers.
- Select your printer (e.g., 'X6h-XXXX') from the list within the app to establish a connection. Ensure Bluetooth permissions are granted to the app.

Image: Visual instructions for connecting the printer to your smartphone via the 'Tiny Print' app.
३.२। थर्मल पेपर लोड गर्दै
- Open the printer's paper loading compartment by gently pushing the top cover upwards.
- Insert a roll of thermal paper. Ensure the arc part of the paper roll is facing downwards, and the printing side (smooth side) is facing up.
- Pull out a small portion of the paper (approximately 1cm) and close the top cover firmly until it clicks into place.

Image: Opening the printer's paper compartment.

Image: Correct orientation for loading the thermal paper roll.

Image: Pulling out paper and closing the printer lid.
९. निर्देशनात्मक भिडियोहरू
Video: A demonstration of the Cudinham X6 Mini Thermal Printer, showcasing its inkless printing capabilities and ease of use.
भिडियो: एक ओभरview of the Cudinham X6 Print Pod Mini Printer, highlighting its features and how it functions.
४. प्रिन्टर सञ्चालन गर्दै
4.1. Printing Photos and Images
- Ensure your printer is connected to the 'Tiny Print' app via Bluetooth.
- In the app, select 'Photo Printing' or 'Graphic Editing'.
- Choose an image from your phone's gallery or use the app's built-in materials.
- Adjust the image as desired (e.g., crop, rotate). Note that the printer outputs in black and white.
- Before printing, adjust the 'Print Depth' setting for optimal clarity. A depth between 4 and 7 is recommended for high-definition images.
- Tap 'Print' to send the image to the printer.

Image: The mini printer in action, printing an image from the app.

Image: App interface for adjusting image print depth.
4.2. Printing Text and Lists
The 'Tiny Print' app offers various templates for notes, to-do lists, and labels. You can also input custom text.
- From the app's main screen, select 'Sticky Note', 'To Do List', 'Document Print', or 'Label Printing'.
- Choose a template or enter your text.
- Adjust text size, font, and layout as needed.
- For text, you can also adjust 'Print Depth' to ensure readability.
- Tap 'Print' to generate your text output.

Image: App interface for adjusting text print depth.
४.३. रचनात्मक अनुप्रयोगहरू
The printer supports both standard and adhesive thermal paper, allowing for diverse creative projects:
- DIY स्टिकरहरू: Print custom designs on adhesive paper for decorating journals, mugs, or personal items.
- Notes & Study Aids: Quickly print study notes, diagrams, or important reminders.
- लेबलहरू: Create labels for organization in your home or office.
- Photo Albums & Bullet Journals: Print small black and white photos to personalize your albums and journals.

छवि: पूर्वamples of creative uses for the cudinham mini printer.
4.4. Operating Video
Video: A demonstration of the Cudinham Thermal Mini Printer, showing its functionality for printing various items like stickers and notes.
5. मर्मतसम्भार
१. प्रिन्ट हेड सफा गर्ने
If print quality degrades or appears unclear after repeated use, the print head (laser bar) may need cleaning. Gently wipe the laser bar, located in the paper loading compartment, with an alcohol-dampened cloth or cotton swab. Ensure the printer is off before cleaning.
5.2. ब्याट्री केयर
The printer is equipped with a built-in 1200mAh lithium-ion battery. To prolong battery life, avoid exposing the device to extreme temperatures. Charge the device regularly, even if not in frequent use, to maintain battery health.
T. समस्या निवारण
| समस्या | सम्भावित कारण | समाधान |
|---|---|---|
| Print is unclear or faded | Dirty print head; incorrect print depth setting. | Clean the print head with alcohol. Adjust the 'Print Depth' in the app (recommended range 4-7 for high definition). |
| Cannot connect to the app via Bluetooth | Bluetooth not enabled; app permissions not granted; printer not discoverable. | Ensure Bluetooth is enabled on your phone and printer. Grant necessary app permissions. Restart the printer and app. |
| Paper jam or incorrect feeding | कागज गलत तरिकाले लोड गरियो; कागजको बाटोमा विदेशी वस्तु छ। | Ensure paper is loaded with the arc facing down and the smooth side up. Remove any obstructions. |
| प्रिन्टर अन भइरहेको छैन | ब्याट्री कम छ; उपकरणमा खराबी छ। | Charge the printer fully. If the issue persists, contact customer support. |
7. निर्दिष्टीकरणहरू
| सुविधा | विवरण |
|---|---|
| ब्रान्ड | कुडिन्हम |
| मोडेल नाम | X6 |
| वस्तु मोडेल नम्बर | MP-01 |
| जडान प्रविधि | ब्लुटुथ |
| मुद्रण प्रविधि | थर्मल |
| प्रिन्टर आउटपुट | Monochrome (Black Ink) |
| अधिकतम मुद्रण गति मोनोक्रोम | ३.० पीपीएम |
| अधिकतम कालो र सेतो प्रिन्ट रिजोल्युसन | 200dpi |
| प्रिन्ट मिडिया | लेबलहरू (थर्मल पेपर) |
| पाना आकार | 57 X 25 Millimeters (Max Media Size: 57 X 350 mm) |
| उत्पादन आयामहरू | १० x ३ x ३ इन्च |
| वस्तुको वजन | 14.4 औंस |
| ब्याट्री | ५२००mAh लिथियम आयन (समावेश गरिएको) |
| हार्डवेयर इन्टरफेस | USB |
8. वारेन्टी र समर्थन
The cudinham X6 Mini Printer comes with a limited warranty. For specific warranty terms and conditions, please refer to the warranty card included in your package or contact cudinham customer support.
यदि तपाईंले यस पुस्तिकामा समेटिएका कुनै पनि समस्याहरू सामना गर्नुभयो वा थप सहयोग चाहिन्छ भने, कृपया भ्रमण गर्नुहोस् cudinham Store on Amazon वा सिधै उनीहरूको ग्राहक सेवामा सम्पर्क गर्नुहोस्।
Ask a question about this manual
Ask about setup, troubleshooting, compatibility, parts, safety, or missing instructions. Manuals+ will review the question and use this page’s manual context to help answer it.