परिचय
This manual provides detailed instructions for the safe and efficient operation, setup, and maintenance of your KRUPS EC314 12-Cup Programmable Digital Coffee Maker. Please read all instructions carefully before first use and retain this manual for future reference.

छवि: अगाडि view of the KRUPS EC314 12-Cup Programmable Digital Coffee Maker, showcasinयसको स्टेनलेस स्टील र कालो डिजाइनमा गिलास क्याराफे राखिएको छ।
महत्त्वपूर्ण सुरक्षा निर्देशनहरू
- उपकरण प्रयोग गर्नु अघि सबै निर्देशनहरू पढ्नुहोस्।
- तातो सतहहरू नछुनुहोस्। ह्यान्डल वा नबहरू प्रयोग गर्नुहोस्।
- आगो, बिजुलीको झट्का र व्यक्तिहरूलाई चोटपटक लाग्नबाट जोगाउन, कर्ड, प्लग वा कफी मेकरलाई पानी वा अन्य तरल पदार्थमा नडुबाउनुहोस्।
- कुनै पनि उपकरण बालबालिकाद्वारा वा नजिकको प्रयोग गर्दा नजिकको पर्यवेक्षण आवश्यक हुन्छ।
- प्रयोगमा नभएको बेला र सफा गर्नु अघि आउटलेटबाट अनप्लग गर्नुहोस्। पार्ट्स राख्नु वा हटाउनु अघि, र उपकरण सफा गर्नु अघि चिसो हुन दिनुहोस्।
- क्षतिग्रस्त कर्ड वा प्लगको साथ वा उपकरण खराब भएपछि, वा कुनै पनि तरिकाले क्षतिग्रस्त भए पछि कुनै पनि उपकरण सञ्चालन नगर्नुहोस्। परीक्षण, मर्मत वा समायोजनको लागि निकटतम अधिकृत सेवा सुविधामा उपकरण फिर्ता गर्नुहोस्।
- उपकरण निर्माताले सिफारिस नगरेको सहायक संलग्नकहरूको प्रयोगले आगो, बिजुली झटका, वा व्यक्तिहरूलाई चोटपटक लाग्न सक्छ।
- बाहिर प्रयोग नगर्नुहोस्।
- कर्डलाई टेबल वा काउन्टरको छेउमा झुन्ड्याउन नदिनुहोस् वा तातो सतहहरूलाई छुनुहोस्।
- तातो ग्यास वा बिजुली बर्नरमा वा नजिकै नराख्नुहोस्, वा तातो चुलोमा राख्नुहोस्।
- सधैं पहिले उपकरणमा प्लग जोड्नुहोस्, त्यसपछि भित्ताको आउटलेटमा कर्ड प्लग गर्नुहोस्। विच्छेदन गर्न, कुनै पनि नियन्त्रणलाई "अफ" गर्नुहोस्, त्यसपछि भित्ताको आउटलेटबाट प्लग हटाउनुहोस्।
- उद्देश्य प्रयोग बाहेक अन्य लागि उपकरण प्रयोग नगर्नुहोस्।
- क्याफे यस उपकरणको साथ प्रयोगको लागि डिजाइन गरिएको हो। यसलाई दायरा माथि कहिल्यै प्रयोग गर्नु हुँदैन।
- भिजेको वा चिसो सतहमा तातो क्याफे नराख्नुहोस्।
- फुटेको क्याफे वा ढीलो वा कमजोर ह्यान्डल भएको क्याराफे प्रयोग नगर्नुहोस्।
- क्लिन्जर, स्टिल ऊन प्याड वा अन्य घर्षण सामग्रीले क्याफे सफा नगर्नुहोस्।
- पकाउने चक्रको समयमा ढक्कन हटाइयो भने स्क्याल्डिङ हुन सक्छ।
उत्पादन अवयवहरू
Familiarize yourself with the parts of your coffee maker:
- स्तर सूचक संग पानी जलाशय
- Control Panel with LCD Screen and Rotating Knob
- ब्रू टोकरी
- गोल्ड-टोन स्थायी फिल्टर
- Glass Carafe with Stay-Cool Handle
- वार्मिङ प्लेट
- ढक्कन

Image: Close-up of the coffee maker's control panel, showing the digital display, rotating brew knob, and water level indicator on the side.
सेटअप
- अनप्याकिङ: सबै प्याकेजिङ सामग्री र कम्पोनेन्टहरू सावधानीपूर्वक हटाउनुहोस्।
- प्रारम्भिक सफाई: Before first use, wash the carafe, lid, and permanent filter in warm, soapy water. Rinse thoroughly. Wipe the exterior of the coffee maker with a damp कपडा।
- पहिलो ब्रू साइकल (सफाई):
- पानीको भण्डारलाई १४ कप सम्मको ताजा, चिसो पानीले भर्नुहोस्।
- Place the permanent filter into the brew basket. Do not add coffee grounds for this cycle.
- वार्मिङ प्लेटमा ढक्कनसहितको क्याराफ राख्नुहोस्।
- कफी मेकरलाई मानक विद्युतीय आउटलेटमा प्लग गर्नुहोस्।
- थिच्नुहोस् BREW button to start a full brewing cycle with only water.
- चक्र पूरा भएपछि, क्याराफेबाट पानी फाल्नुहोस्। तपाईंको कफी मेकर अब प्रयोगको लागि तयार छ।
- घडी सेट गर्दै:
- Ensure the coffee maker is plugged in.
- थिच्नुहोस् र होल्ड गर्नुहोस् घडी button (usually located near the display).
- प्रयोग गर्नुहोस् + र - buttons or the rotating knob to set the current time. Pay attention to AM/PM indication.
- जारी गर्नुहोस् घडी समय बचत गर्न बटन।
सञ्चालन निर्देशनहरू
Basic Brewing
- पानी जलाशय भर्नुहोस्: Open the lid and pour fresh, cold water into the water reservoir. Use the water level indicator on the side to fill to your desired number of cups (up to 12 MAX).

Image: A hand holding the glass carafe, pouring water into the coffee maker's open water reservoir.
- कफी मैदानहरू थप्नुहोस्: Place the gold-tone permanent filter into the brew basket. Add the desired amount of ground coffee. A general guideline is one tablespoon of ground coffee per cup, but adjust to your taste.

छवि: नजिकबाट view of the gold-tone permanent filter filled with ground coffee, placed inside the brew basket.
- क्याराफे स्थिति: ढक्कनसहितको गिलास क्याराफ वार्मिङ प्लेटमा सही तरिकाले राखिएको छ भनी सुनिश्चित गर्नुहोस्।
- पकाउन सुरु गर्नुहोस्: थिच्नुहोस् BREW button. The brewing indicator will illuminate, and the brewing process will begin.
- रोक्नुहोस् र सेवा गर्नुहोस्: You can temporarily remove the carafe during brewing to pour a cup. The drip stop feature will prevent coffee from dripping for a short period. Return the carafe to the warming plate within 20 seconds to prevent overflow.
- न्यानो राख्नुहोस्: After brewing, the coffee maker will automatically enter the "Keep Warm" mode, maintaining the coffee's temperature for up to four hours. The display will show the remaining keep-warm time.
प्रोग्रामिंग सुविधाहरू
- स्वत: अन टाइमर:
- Prepare the coffee maker for brewing (water and coffee grounds added).
- थिच्नुहोस् AUTO ON 1/2 button. The display will show "AUTO ON 1" or "AUTO ON 2".
- प्रयोग गर्नुहोस् + र - buttons or the rotating knob to set the desired brew start time.
- थिच्नुहोस् AUTO ON 1/2 button again to confirm the time. The indicator light will illuminate, signifying the timer is set.
- The coffee maker features dual program settings, allowing for separate weekday and weekend auto-on times.
- Brew Strength (REG/BOLD):
- पकाउनु अघि, थिच्नुहोस् REG/BOLD button to toggle between regular and bold coffee strength. The selected strength will be indicated on the display.
- Small Batch (1-4 Cups):
- When brewing 1 to 4 cups, press the 1-4 button before starting the brew cycle. This optimizes the brewing process for smaller quantities to ensure full flavor.
- Keep Warm Temperature and Time:
- थिच्नुहोस् TEMP button to cycle through three preset warming plate temperatures.
- थिच्नुहोस् TIME button to adjust the keep-warm duration up to four hours.

छवि: विस्तृत view of the coffee maker's control panel, highlighting the digital display, brew strength, and keep warm settings.
मर्मतसम्भार
दैनिक सरसफाई
- सफा गर्नु अघि सधैं कफी मेकर अनप्लग गर्नुहोस्।
- Wash the carafe, carafe lid, and permanent filter in warm, soapy water after each use. These parts are not dishwasher safe.
- कफी मेकरको बाहिरी भागलाई नरमले पुछ्नुहोस्, डीamp कपडा। घर्षण क्लीनर वा स्काउरिङ प्याडहरू प्रयोग नगर्नुहोस्।
- कफी मेकरलाई पानी वा अन्य कुनै तरल पदार्थमा नडुबाउनुहोस्।
वर्णन गर्दै
Mineral deposits (limescale) can build up in your coffee maker over time, affecting performance and coffee taste. The सफा indicator on the display will illuminate to remind you when descaling is recommended.

Image: Two cups of coffee with coffee beans, emphasizing the importance of descaling for optimal performance.
- डिस्केलिङ समाधान तयार गर्नुहोस्: Mix 1 part white vinegar with 2 parts cold water, or use a commercial descaling solution designed for coffee makers. Fill the water reservoir with this solution up to the 12-cup mark.
- डिस्केलिङ साइकल सुरु गर्नुहोस्: Place the empty carafe with its lid on the warming plate. Press the सफा button. The coffee maker will perform a descaling cycle.
- कुल्ला चक्रहरू: After the descaling cycle is complete, discard the solution. Fill the water reservoir with fresh, cold water and run two full brewing cycles with only water to rinse the system thoroughly.
- द सफा indicator will turn off after the descaling process is complete.
समस्या निवारण
| समस्या | सम्भावित कारण | समाधान |
|---|---|---|
| कफी बन्दैन। |
|
|
| कफीको स्वाद कमजोर हुन्छ। |
|
|
| ब्रू टोकरीबाट कफी ओभरफ्लो हुन्छ। |
|
|
| "CLEAN" indicator remains on after descaling. | Descaling cycle not fully completed or not enough rinse cycles. | Run additional rinse cycles with fresh water until the indicator turns off. |
निर्दिष्टीकरणहरू
- मोडेल: EC314
- क्षमता: ३ कप (२४ औंस)
- शक्ति: 110 भोल्ट, 1300 वाट
- आयाम (D x W x H): ८५.४" x ६२.२" x ३९"
- वजन: 9.9 पाउन्ड
- सामग्री: स्टेनलेस स्टील, प्लास्टिक
- फिल्टर प्रकार: Reusable Gold-Tone Filter
- विशेष सुविधाहरू: Programmable, Auto-On, Brew Strength Control, 1-4 Cup Setting, Adjustable Keep Warm Temperature & Time, Pause & Serve, Descale Reminder.
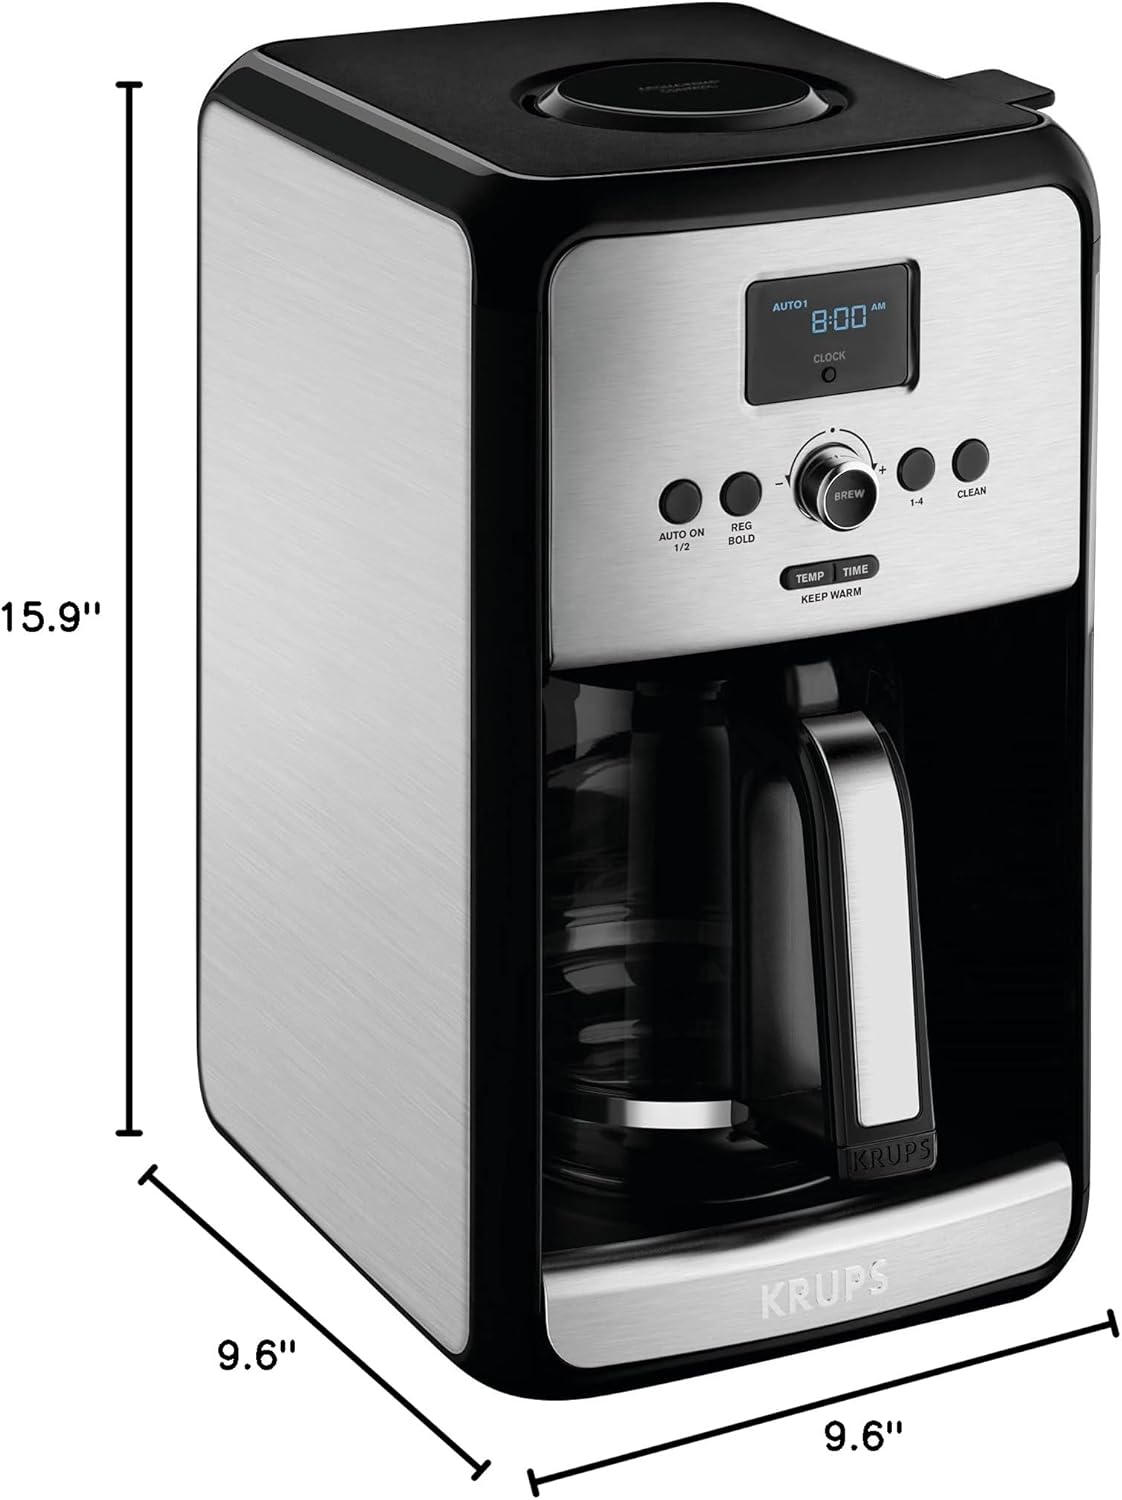
Image: Diagram showing the dimensions (depth, width, height) of the KRUPS EC314 coffee maker.
वारेन्टी र समर्थन
For warranty information, product registration, or technical support, please refer to the official KRUPS website or contact KRUPS customer service. Keep your proof of purchase for warranty claims.
अनलाइन समर्थन: भ्रमण गर्नुहोस् www.krups.com for FAQs, product information, and service center locations.
ग्राहक सेवा: Contact information can typically be found on the KRUPS webसाइट वा प्याकेजिङ सामग्रीहरूमा।